Users
Introduction
The Users page is the main administration area for user access and account-level security in Backup Administration for Microsoft 365. This page helps administrators quickly find users, review identity and tenant settings, and perform common operational tasks such as enabling or disabling accounts, applying MFA-related (multi-factor authentication) actions, and checking role coverage. Note that MFA also has a user-side component, where end users configure two-factor authentication in their My profile area (described in detail in the Configuring multi-factor authentication (MFA) subchapter).
On this page, users with the required permissions can work at two levels:
- Users list level: review the user table, search and sort entries, apply list-level actions from the command bar, and open specific user details.
- User details level: review and update account settings, manage login methods, inspect current sessions, and review role assignments.
In the default Users list view, you can see and use:
- A tenant selector area to confirm which tenant context is active.
- A top command bar with the following actions (visible when one or more users are selected in the list):
- Refresh: reload the current user list.
- Delete: permanently remove the selected users from the Users page and list.
- Enable / Disable: control whether the selected users can sign in to contentACCESS.
- Enforce MFA / Disable MFA: manage multi-factor authentication enforcement for selected users.
- Clear selection: deselect all currently selected rows.
- A user table with key columns (for example Display name, Email address, and Roles).
- Table controls such as row selection checkboxes, sorting, keyword search, and pagination.
You can access user details using one of two methods:
- Quick edit via context menu: Click the three-dot context menu (…) next to a user row and select Edit to open the User panel (modal window) for quick viewing and editing of user details.
- Full user details page: Click the user's display name to navigate to the User details page, where you can view and edit all user properties, manage login methods, inspect sessions, and review role assignments.
Regardless of the method used, the following panels become available:
- User details for identity and security properties.
- User logins for login method management.
- User login sessions for session visibility and session-level control.
- Role assignments for reviewing and managing granted roles.
Prerequisites
- You need the permission
Manage users and rolesto open the Users page and the User details page. - Some fields and actions are only available when your effective permissions allow them.
If you do not see System > Users in the left menu, contact your administrator to confirm that you have the required permissions.
Open Users
- In the left menu, select System > Users.
- If your environment uses tenant selection, select the correct tenant first.
Find and open users
On the Users page, you can:
- Select one or more users with the row checkboxes and run bulk actions from the top command bar.
- Use Refresh to reload the current list state.
- Use Delete to permanently remove the selected users from the Users page and list.
- Use Enable or Disable for selected users to control whether they can sign in to contentACCESS.
- Use Enforce MFA or Disable MFA for selected users to control whether they are enforced to configure multi-factor authentication or not.
- Use Clear selection to remove the current row selection.
- Search users by keyword.
- Sort users by available sortable columns (for example Display name).
- Filter by:
- Display name
- Email address
- Roles (multi-select)
- Switch pages and adjust page size using the pagination controls below the table.
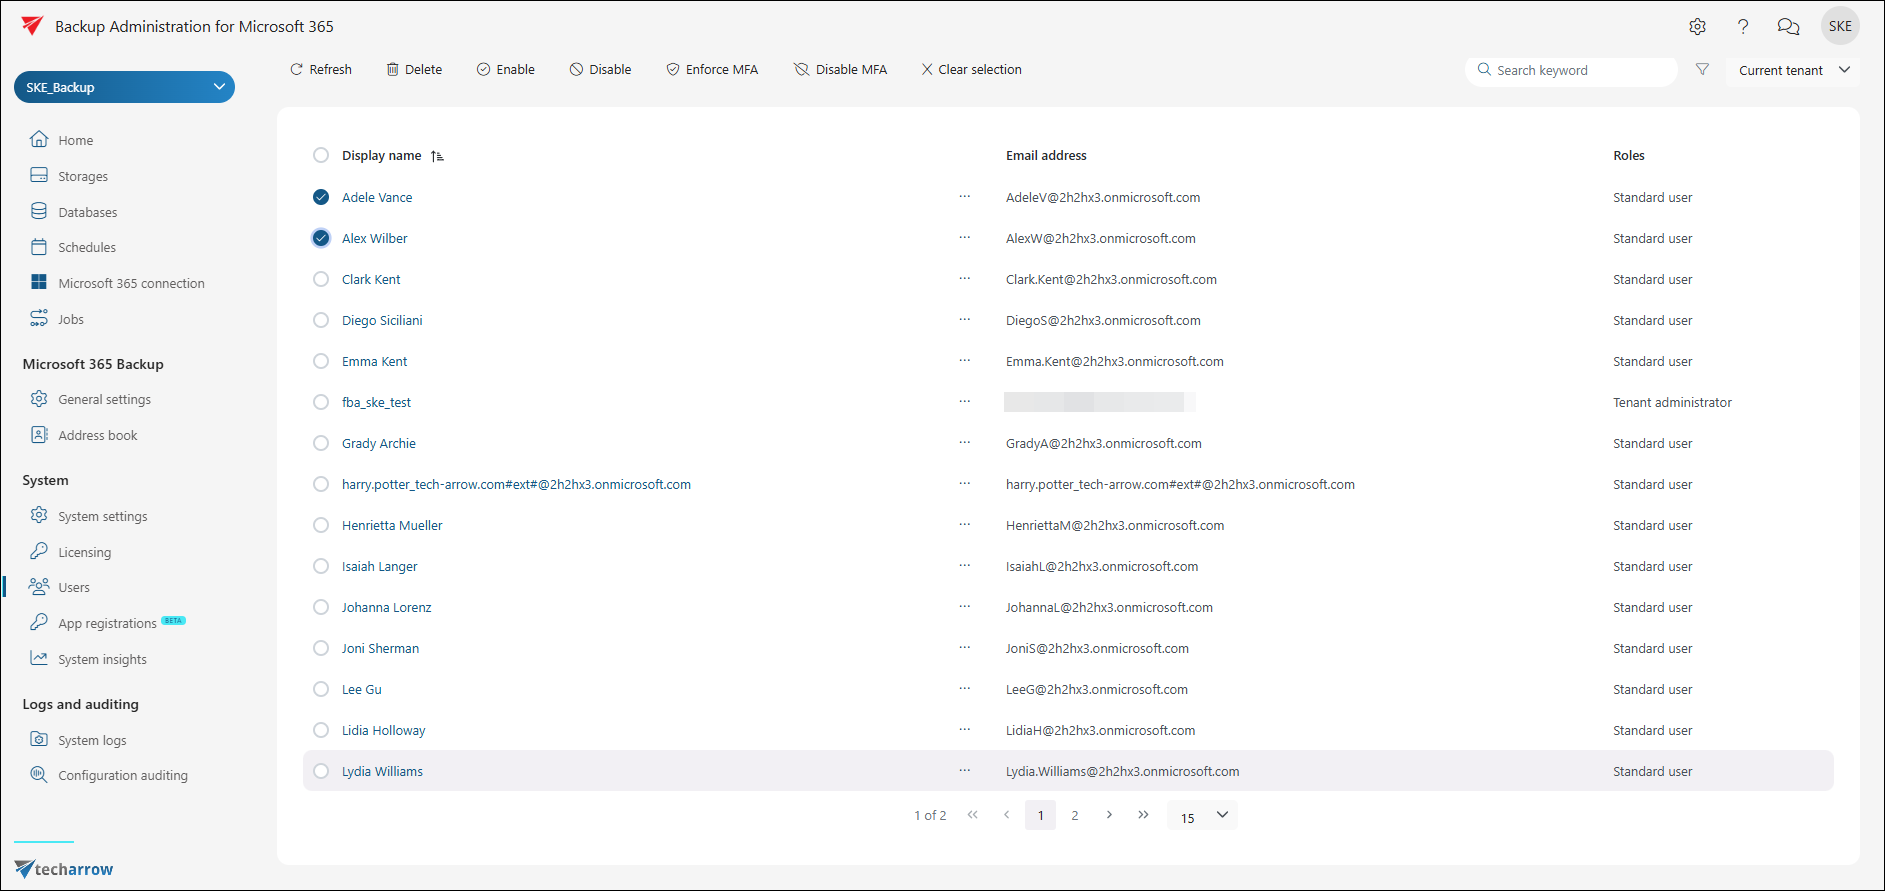
To open a user, you can use one of two methods:
- Quick edit via context menu: Click the three-dot context menu (…) next to a user row and select Edit to open the User panel (modal window) for quick viewing and editing of user details.
- Full user details page: Click the user's display name to navigate to the User details page, where you can view and edit all user properties, manage login methods, inspect sessions, and review role assignments.
View and edit user details
The User details panel shows key user information and security-related settings.
What you can see
- Display name: The name shown for the user throughout the UI (for example in lists, audit views, and selections).
- Email address (not shown for service users): Used for system emails sent to the user. Keep this address valid and up to date so the user receives notifications.
- Default tenant: The tenant the user is associated with by default.
- System administrator (read-only): Indicates whether the user has the system administrator role.
- Online status (read-only): Indicates whether the user currently has an active login session. A user is shown as online when their last activity was within the last 5 minutes.
- MFA enforcement (user-level): Whether multi-factor authentication is enforced for this user at user level.
- MFA enabled: Whether the user has completed MFA setup.
- Enabled: Whether the user is allowed to sign in to contentACCESS. If disabled, the user cannot log in regardless of their login method or role assignments.
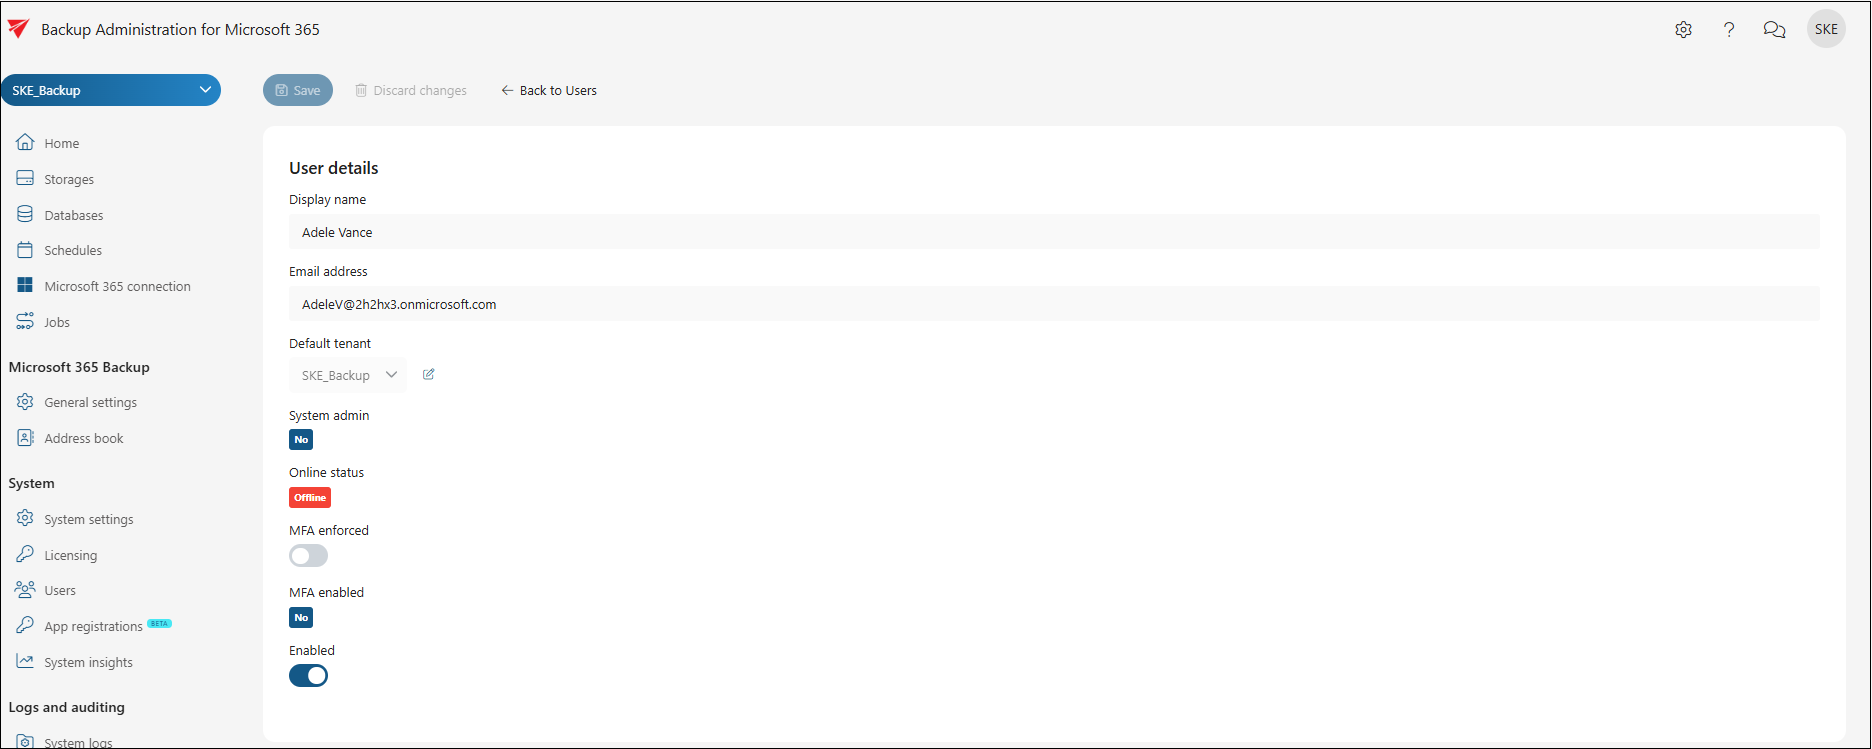
What you can change
Depending on your permissions and the user type, you can:
- Update Display name.
- Update Email address (not applicable to service users).
- Change the user’s Default tenant.
- This action requires an explicit confirmation before the Default tenant field becomes editable.
- You can unlock the field using the edit icon next to the current tenant value.
- Enforce MFA at user level (toggle).
- The UI indicates when MFA is already enforced at a higher level (system or tenant). If so, the higher-level enforcement remains in effect.
- If the user has already completed MFA setup, a Reset button appears next to the MFA enabled field. Clicking Reset clears the existing MFA setup so the user must enroll again.
- Enable or disable the user (toggle). Disabling a user prevents them from signing in to contentACCESS until re-enabled.
- Save changes with Save and revert unsaved edits with Discard changes from the top action bar.
- Return to the list with Back to Users.
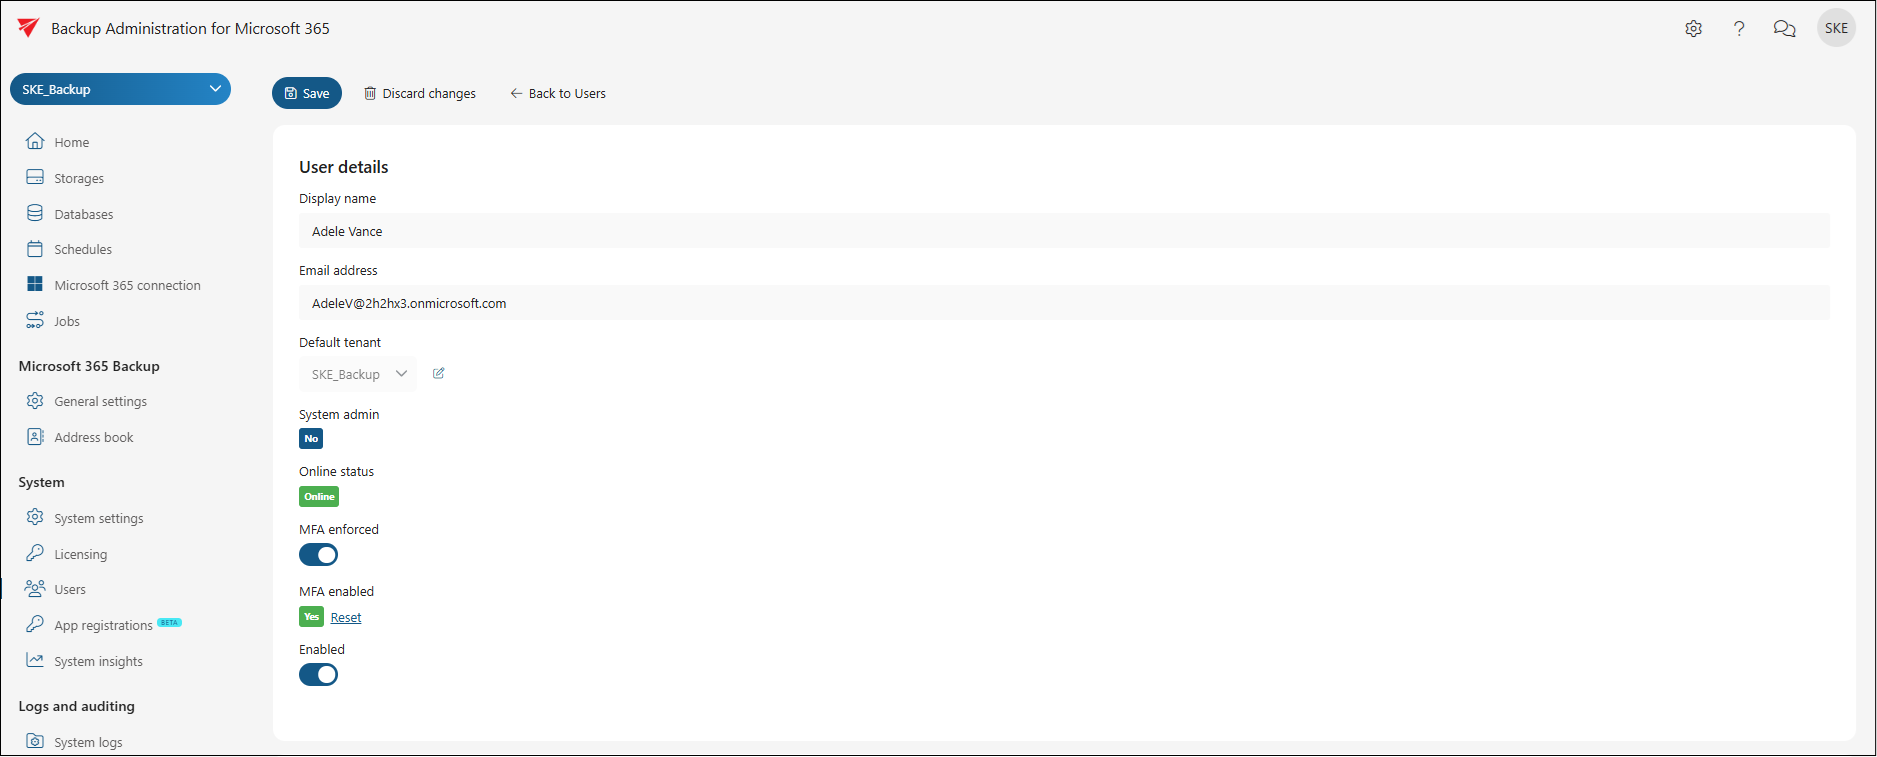
Multi-factor authentication (MFA) in the Users page
Step-by-step guidance for MFA enforcement, user setup, sign-in, and MFA reset is documented in a dedicated subchapter:
Manage login methods (User logins)
In the User logins panel, you can:
- View configured login methods.
- Add a new login method.
- Delete a login method.

Forms logins
- Change password: enter the old password and a new password.
- Reset password:
- Generate a strong random password, or
- Set a manual password.
- (Optional) Send an email notification (enter an email address).
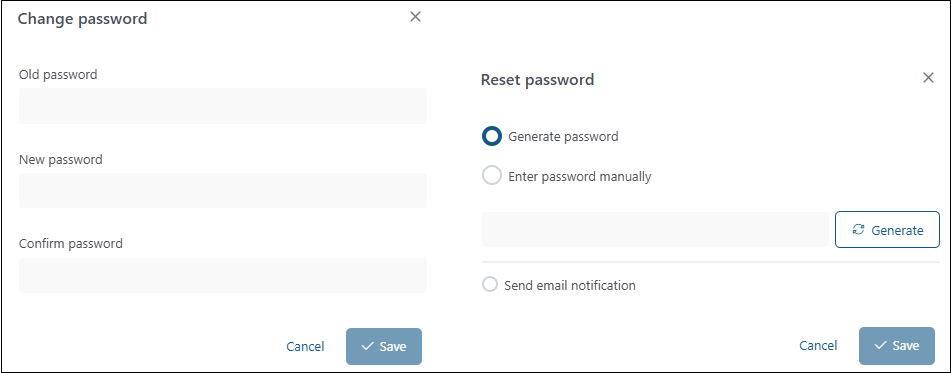
Windows / External AD logins
When you add a login, the username is validated and resolved before it can be saved. The External AD login type allows users to authenticate using their remote Active Directory credentials. contentACCESS communicates with a WCF service on the contentACCESS proxy to look up and verify the user in the remote Active Directory; if the lookup succeeds, the user is allowed to sign in. For setup details, see External AD login provider.
EAExchange login type
When you add a login, provide the additional fields requested by the UI (for example domain, SAM account name, and tenant selection). The Microsoft Exchange login type allows users to authenticate using their email address and mailbox password. contentACCESS verifies the credentials by attempting to open the user's mailbox through Exchange Web Services (EWS); the user's password is not stored in contentACCESS and is managed entirely by Exchange. For setup and prerequisites, see Exchange login provider.
The actions shown in the login context menu depend on the selected login type.
Review and terminate active sessions (Login sessions)
In the Login sessions panel, you can review active sessions, including:
- Login type
- Last access time
- Expiration
- IP address
- User agent

To force a sign-out on a specific device or browser, open the context menu (...) next to the session and select Log off to terminate the relevant session.
This is useful when you need to sign out a single session without disabling the entire user.
If there are no active sessions, the panel shows a No active sessions found state.
Inspect role assignments (Role assignments)
In the Role assignments panel, you can review the role assignments granted to the user.
You can also use Manage to automatically open the Central Administration User details page for role assignment management, when your permissions allow role administration. For more information about user and role management in Central Administration, see Users in contentACCESS.
You can filter and sort role assignments by:
- Tenant: The tenant the role assignment applies to.
- Permission category: The functional area that owns the permissions (for example Email archive or SharePoint archive).
- Role name: The name of the assigned role.
- Flags (manual/automatic): Indicates whether the role assignment was granted manually by an administrator or automatically by a provisioning/automation process.
- Target: The objects the role assignment applies to.

Actually, the Roles panel is intended for visibility and auditing. It does not provide an editor to add or remove role assignments.
Service users vs. normal users
Some fields and panels behave differently for service users (see more in App registrations):
- Email is not shown and cannot be edited in User details.
- Some actions that assume interactive sign-in (for example managing login methods) may be hidden or not applicable, depending on where you open the user (detail page vs. sidebar).
Tips and common workflows
- User can’t log in: check Enabled, then inspect User logins and Login sessions.
- User lost their MFA device: trigger an MFA reset, then have the user enroll again.
- Need to sign out one device: terminate the specific session in Login sessions.
- Confirm what a user can access: inspect Roles, and optionally filter the Users list by role.