Hosted Exchange Server configuration
Introduction
The Hosted Exchange Server configuration page allows administrators to configure the connection between contentACCESS and a hosted Exchange Server. It covers the Exchange connection settings, PowerShell access configuration, credentials, and connection testing required to enable email archiving from a hosted Exchange environment.
These settings are available under Email Archive => Settings => System settings on the ribbon.
Note: Before you begin, make sure to select or create a user account with a valid mailbox license. This account will be used as the "superuser" to access mailboxes. The permissions required for this account are described in Superuser permissions.
Exchange connection settings
Set the Exchange server type to "Hosted Exchange".
Select the Exchange server interface version corresponding to your Exchange Server version. Since older Exchange Servers have already reached end-of-life, the recommended version is Exchange 2016 or higher.

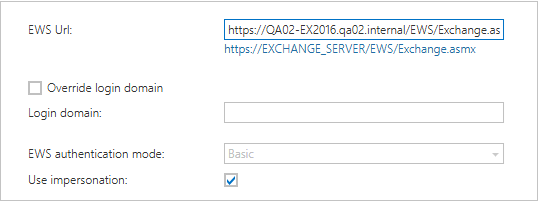
Access to a hosted Exchange Server always uses EWS (Exchange Web Services) with Basic authentication.
- EWS URL: Enter the URL in the format
https://servername/EWS/Exchange.asmx. - EWS authentication mode: Fixed at "Basic" authentication.
- Use impersonation: Determines how permissions on mailboxes are managed in your organization:
- Delegation (without impersonation) requires explicitly granting Full access permissions on all archived mailboxes.
- Impersonation requires an account with the ApplicationImpersonation role.
It is recommended to use impersonation. For more details, see Superuser permissions.
On a hosted Exchange Server, contentACCESS uses a Hosted Exchange authentication method, which uses the configured Exchange Server to authenticate the user. Depending on the hoster configuration, a different domain name may be required for user logins. In this case, configure the Override login domain and Login domain options. Enter either the NETBIOS domain name or the fully qualified domain name as Login domain.
Configure PowerShell access
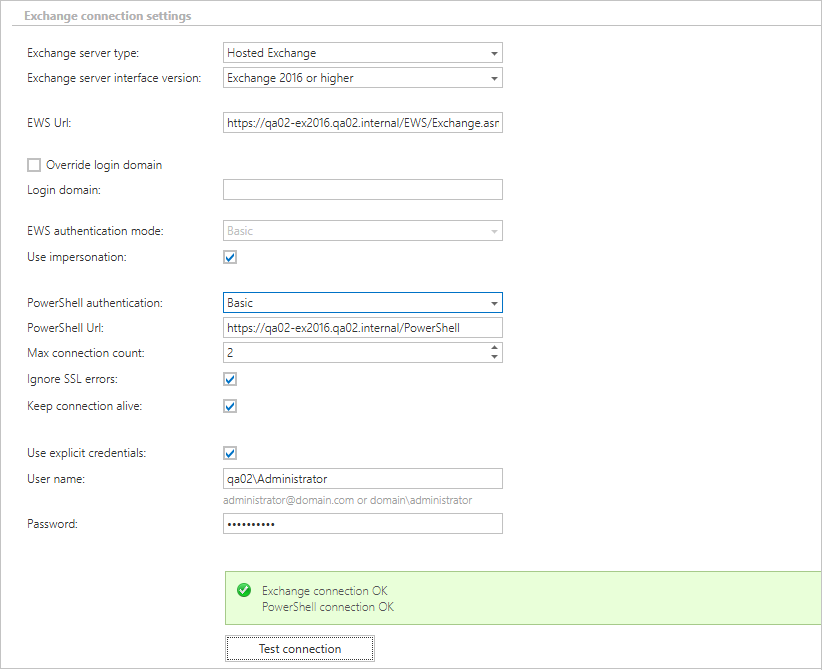
- PowerShell authentication: Select from the available authentication options. It is recommended to use the same Basic authentication as used for EWS.
info
Note: Basic authentication for PowerShell might not be enabled by default and needs to be enabled on the Exchange Server (by configuring the PowerShell virtual directory). Consult with your Exchange hoster.
- PowerShell URL: Enter the URL in the format
https://servername/PowerShell. - Max connection count: Limits the number of concurrent connections made by contentACCESS to PowerShell. The recommended value is
3. - Ignore SSL errors: Use this option only if you have a self-signed certificate for the Exchange Server. If you have a valid certificate, this option can be left unchecked. Test the connection to find out whether you have certificate errors.
- Keep connection alive: Allows contentACCESS to reuse existing connections instead of creating a new one when needed. Although keeping the connection alive can have performance benefits, it might cause issues, especially if a load balancer is used.

Credentials
Both the EWS connection and the PowerShell connection use the same account, configured under Username and Password. It is recommended to enable Use explicit credentials to specify the account. If an explicit account is not selected, contentACCESS must be configured to run under a specific Active Directory account.
For more information, see the Installation section and the Superuser configuration page.
When entering the explicit account, you can use either the DOMAIN\user format or the UPN format user@domain, depending on which format is accepted by your Exchange Server.

Test the connection
It is recommended to test the connection after each change. Both the EWS and PowerShell connections are tested, and the result of the test is displayed.
The sections below provide additional context on access and permissions related to hosted Exchange integration, covering Portal access, superuser permissions, and impersonation.
Portal access
contentACCESS can provide access to archived data for users through Portal access logins, which are configured on the Provisioning settings page.
When working with a hosted Exchange Server, it is recommended to configure the "Microsoft Exchange" login provider in contentACCESS. Users will use Exchange authentication to log in to contentACCESS. The email archive will create the Exchange logins for the users and synchronize the permissions based on these Exchange logins.
Superuser permissions
The superuser account must be an active account with a valid mailbox license. The account requires the following Exchange roles:
- ApplicationImpersonation (for impersonation)
- View-Only Organization Management or Organization Management
- Org Custom Apps
- Org Marketplace Apps
- User Options
The roles Org Custom Apps, Org Marketplace Apps, and User Options are required for the installation and usage of contentACCESS MailApp.
The following superuser access methods are available:
- Impersonation (recommended)
- Delegation
Impersonation
Impersonation allows the superuser to impersonate any account in the organization and access mailbox data. Configuring impersonation is simple: grant the ApplicationImpersonation Exchange management role to the account.
Benefits:
- The impersonating account has access to all mailboxes in the organization.
- New users are automatically granted permission; no further action is needed.
- Throttling is less likely to happen.
Drawbacks:
- To restrict permissions to certain users, an additional management scope needs to be created.
Note: The following script creates a dedicated role assignment in Exchange and grants the ApplicationImpersonation role for the superuser:
New-ManagementRoleAssignment -name:contentACCESSImpersonation -Role:ApplicationImpersonation -User:superuser
For more details about impersonation, see How to configure impersonation.
Delegation
To access the accounts in the organization, the superuser should be granted delegate access on each account individually. The superuser is granted Full mailbox access on all accounts. This can be done either at the mailbox database level (for all Exchange mailbox databases) or at the user level using Exchange Management Shell.
Configuring delegation is more complicated and requires the administrator to set permissions on newly created mailboxes regularly.
Benefits:
- Useful if only certain users are archived.
Drawbacks:
- Complicated configuration; ongoing maintenance needed.
For more information about connecting to Exchange PowerShell and configuring required superuser permissions (including delegation and impersonation), see PowerShell scripts for setting up Email archive.